Tuesday, March 29, 2011

One Pattern, Two Different Looks

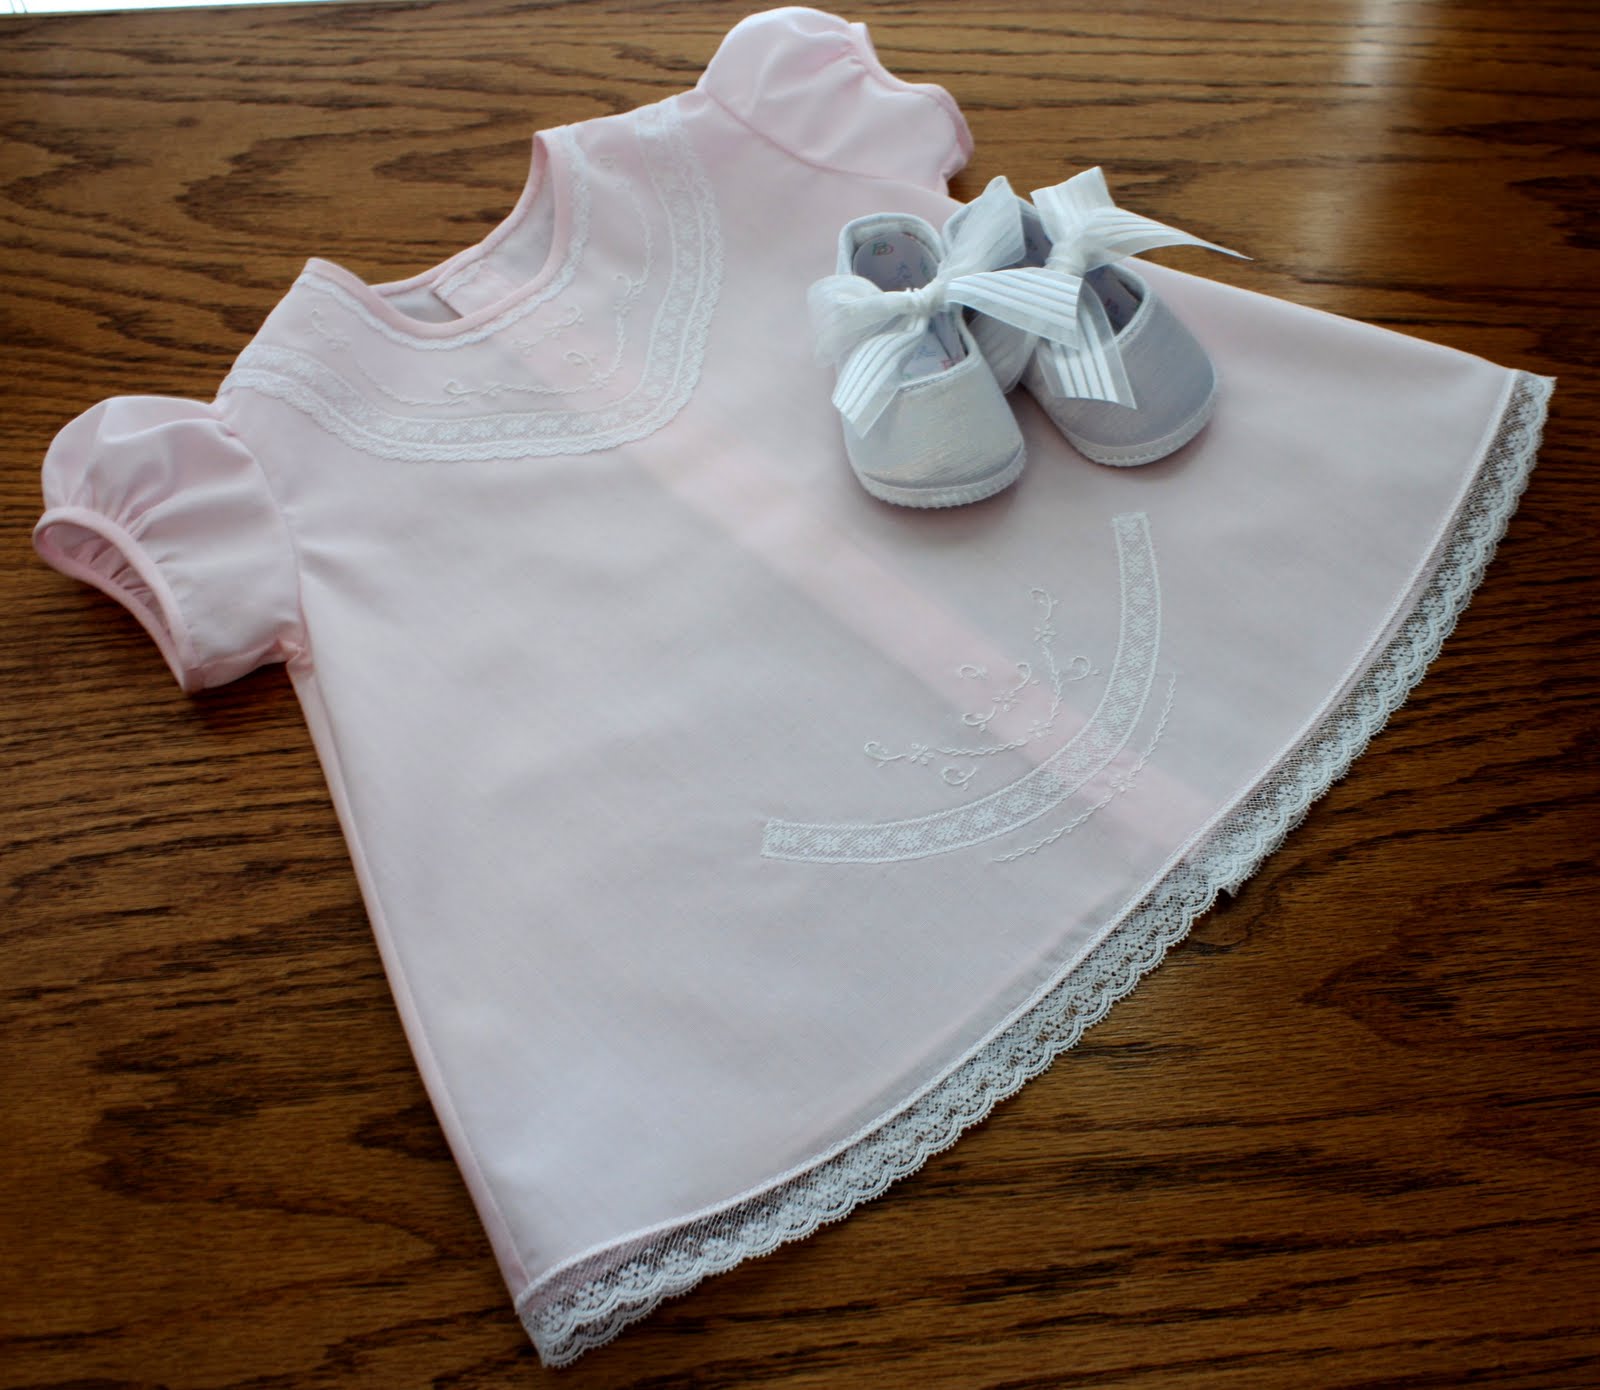
I thought that I would give you a peek at two of the dresses that I recently sent to baby Emma. Both dresses were made using pattern #122, and as you can tell, the looks are totally different! The pink dress was made from pink pima cotton, lace, and hand embroidery. The lace placement and hand embroidery are an original design.

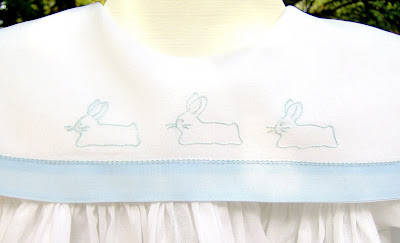
While the second dress was made from a cotton print and trimmed with purple gingham. The panties were made using pattern #123.

This is the stage of construction where I added the bias trim and the little bow. I used my flexible curve to help me get the gentle curve to the bias tape. I slip stitched the bias trim by hand so my stitching wouldn't show. Don't you love a pattern that can be used over and over again?

Michie'

Friday, March 25, 2011

And The Winners Are....

So, here are our two winners from the random drawing. If you are not inspired to sew this year for Easter, you will be when you finishing reading the entries! I would like to thank everyone who left a comment. They brought back a lot of Easter sewing memories for me also!

Belinda said... I am making a smocked bishop from an eyelet fabric for my 7 month old granddaughter. When I get that finished, I hope to make the Kewpie outfit on the last issue of AS&E cover. I have a heart fabric in shades of blue to match her beautiful blue eyes!It is so fun to get back into sewing for little girls - every year I made special Easter dresses for my two girls and sometimes had enough time to make a matching mom dress too - those were the days.

Pat said... Last Easter I made 4 outfits for my four grandchildren. Three were exactly the same since they were three girls in the same family. I tried not to get bored. They looked so precious matching! The one that was most fun was the one for my grandson!

If you two ladies will please email me at crmichie@aol.com your name, address and pattern or book choice, I will get them in the mail right away.

Michie'

Thursday, March 24, 2011

Oops!

Just wanted to let you know that if you have tried to download the directions for the instructions on the previous blog, it is now working! Note to self......if blogger is acting up when I am working with it, go back to it later.

I got permission from Anna to post this picture of her which was taken just minutes before she walked down the isle 3 years ago. Sometimes the expression says a lot. This picture has been one of our favorites and we ran across it the other day while getting ready to go to Breast Feeding Class. Things sure change in 3 short years!

In case you are wondering....I went with her to Breast Feeding Class because it was out of her husband's comfort zone and there are just things that women are meant to do together. I did not make her wedding dress (thank you Anna) but did make the veil and added all those teeny tiny seed pearls to the head piece. I wore the earrings to out oldest sons wedding and she and I each wanted to wear them to hers. So they are now referred to as the "wedding earrings." And my favorite thing is her necklace, they are her Barbie "pearls" that she has had since since she was about 10 years old and that she always considered her good jewelry and wore for special occasions. Every time a think of the necklace it reminds me of how fun Anna is!

Michie'


Wednesday, March 23, 2011

Embroidered Bunnies

Here is a little inspiration to get you going on your Easter Sewing! I made both outfits from pima cotton and few simple changes to the collars were all that was needed to give them a totally different look.

The little boy's bubble was made from pattern #115 and the embroidered bunnies are in the Heirloom Embroidery Book. To change up the look of the collar a Madeira Trim was added to the bottom edge.
The little girl's dress was made from pattern #131 and appeared in Creative Needle Magazine several years ago.

Click here for down loadable directions for the Madeira trim collar. Good luck with your Easter Sewing!


Michie'

Sunday, March 20, 2011

Spring Giveaway!


In celebration of Spring officially being here, and the fact that it actually FEELS like Spring, it is time once again for a free giveaway!

All you need to do is leave a comment on this blog telling us about a past or present Easter sewing project that is dear to your heart. I will randomly draw 2 names from the comments who may choose a free pattern or book! The drawing will take place Friday March 25th.

Michie'

Friday, March 18, 2011

How To Leave A Comment


I have had several women asked me recently "How do I leave a comment?" I do not think this is a silly question at all because I asked Anna the same question about two years ago. It is really very simple, first scroll down to the bottom of the blog you would like to comment on and click on "Comments". You will see two columns of text, the one on the left are the comments people have left, in the right hand column will be your choices for leaving a comment. The top box you will see is your text box where you will write you comment. That is easy enough, next you need to choose how to make your identity known or unknown. The first option allows you to sign in using an existing google account (email address). The second option allows you to sign in using a few other accounts; Open ID, Live Journal, Word Press, Type Pad, and AOL. The third option allows you to leave your name and a link to a website (URL). The fourth option allows you to leave a comment anonymously. You can choose any of these (providing the first two you have an account with any of the mentioned websites), however keep in mind if you select anonymous when entering a drawing we will not know who you are unless you give us your name in your comment. After selecting how to identify yourself you can then preview your post before submitting it. Once you submit your post it should show up shortly on the comment page.


Comments on blogs are very important to the bloggers. It reminds us that we are not talking to ourselves and let's us know what you are interested in!


Michie'

Wednesday, March 16, 2011

Easter Sewing

What a nice surprise to see how Connie Palmer used two of my patterns for Easter Outfits! The romper was made from pattern #133 and the dress was made from pattern #131. The embroidery is "Chicks and Bows" by Kathy Drew Designs. Kits for both outfits are available from Farmhouse Fabrics.


Have you started your Easter sewing or are you in total denial that it is only about 6 weeks away? I would like to know!
Michie'

Saturday, March 12, 2011

Anniversary Time

So, what did we do to celebrate our 34th anniversary last weekend? Why took my serger in to get it serviced of course! :) Actually, we worked in dinner and a movie and the sewing machine repair store happened to be in the area. But it is just like us to work in something practical while we are out and about.

The coffee cups in the picture were voted "The Christmas Present That Made Us Smile This Year" by us. Daniel, who is a very creative gift giver, decided mugs with our names on them were too boring. So, our mugs have our "pet" names for each other on them! We make a point to use them every Saturday morning when we have time to sit down and eat breakfast together. They seem to get our weekend off to a good start!

The mugs were purchased from http://www.redenvelope.com/
Michie'

Monday, March 7, 2011

Substitute Size Tag

This was my solution this week when I ran out of 3 month size tags! I like to put the size tags down near the hem of the dress, so a few quick stitches on the side seam was all that it took.

I would also like to answer a question that I had recently about detachable collars. There are several methods that work well. I generally attach a loop and button to the back of the collar and then sew a couple of clear plastic snaps to the underside of the bias edge of the collar and to the wrong side of the neck edge of the garment. The snaps help keep the collar from moving as it is being worn.

Michie'

Saturday, March 5, 2011

Baby Quilt #2

I started a quilt for baby Emma as soon as we found out that she was on the way. Since I hand quilt, I had to work at it pretty diligently, and of course loved every minute of the process. While working on Emma's quilt I was also aware that I would be starting the quilt for Anna's baby right away. Anna also assured me that if I did not have a quilt ready for her baby, that she would not let me forget it! :)

Well, here it is! Totally completed, and Anna still has 2 months to go! You might notice that Anna's quilt is very similar to Emma's. Quilting is the one thing that I try to keep super simple. I hand embroidered the sheep, pieced the quilt on the sewing machine, and then quilted by hand. I managed to cope with a whole lot of football this year, by having the quilts to work on! The quilts were not made to match the nurseries, and good thing, since Anna changed her mind about the bedding after the quilt was started. The quilt also has some fabric left over from Emma's quilt and scraps from a quilt that I made Anna when she was about 2 years old.

I've never made two quilts that close together before! Isn't that how things go? You wait for grand babies and then they come 6 months apart!

Michie'

Thursday, March 3, 2011

Goodbye Old Friend

Dear Pleater,

We first met on Mother's Day 1989, when Anna was about to turn 2 years old and Rex figured out that smocking was not going to be a passing fancy for me. You were very patient as I learned to smock those first little dresses while in return I treated you like the treasured possession that you were. Together, we made numerous dresses for Anna and as she out grew smocking we moved on to sewing for a niece and baby gifts. As I was beginning to think that you were about to be retired to the sewing closet, I began doing custom sewing, teaching classes and constructing ready-to-smock garments, and then together we started a business! I shudder when I think of the amount of fabric that you pleated during those years, but except for occasionally needing a new needle, you seemed happy with the arrangement.

I was in total denial the first time that you began to show signs of aging. After close examination, the verdict was that your finely crafted gears were just plain wearing out! And what a coincidence that it was on the first dress that I was pleating for baby Emma! I do believe that the fact that you were expected to work for the next generation of our family was a little too much for you. All is forgiven, I am also not the same that I was 22 years ago. So, I bid you goodbye with the comforting thought that you have now been replaced with the exact same model, a Martha Pullen 16 row pleater!

Michie'

Tuesday, March 1, 2011

#127 Details

A little tutorial here on applying the lace and neck band to pattern #127.

Following the pattern instructions, the lace is gathered, pinned, and stitched around the neck opening, a little less than 5/8" from the raw edge.

With the right sides together, the neck band is placed on top of the lace and stitched in place using a 5/8" seam.

I then like to use a zigzag stitch with a width of 3.5 and a length of 1.8 and stitch close to the first stitching. The excess fabric is then trimmed away using the zigzag stitch as a guide line.

The raw edge of the neck band is then trimmed if necessary and it is turned under and slip stitched in place by hand.

Most of us creative people are VERY visual, so I am sure there are several of you who now have a clearer understanding of the pattern instructions! :)

Michie'

LinkWithin

Related Posts with Thumbnails