Saturday, September 26, 2009

"Duck and Bee" Receiving Blanket


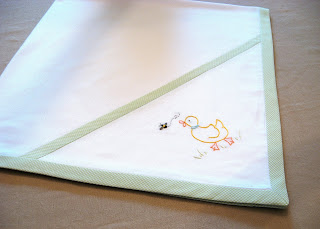
Every baby needs receiving blankets and this is one of my favorites to make! This is a great gift when you are wanting something special, but don't have a lot of time. You will need 1 1/3 yards of good quality flannel for the blanket, and less than a yard for the bias binding. The blanket is a 36" square and the corner piece for the embroidery is a 18" triangle. Complete the embroidery on the triangle first, then add the bias strip to the top of the triangle piece. Pin and baste the triangle to one corner of the blanket and machine or slip stitch the bias binding to the blanket. Make and stitch the bias binding to the outer edges of the blanket. You can refer to the "Bias Bound Collar" blog if you need instructions for making and stitching bias binding.

Feel free to print the "Duck and Bee" embroidery design and enlarge or reduce it to the size you need. The instructions for all the stitches are in the "Heirloom Embroidery Book."

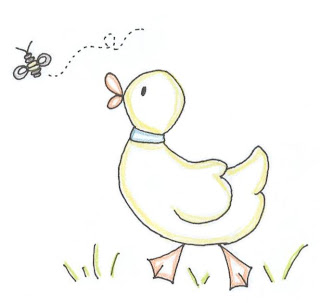
DMC Floss: Black, 598, 611, 646, 722, 743, 772
Use 3 strands of floss for all stitches
Outline Stitch- Duck's Body, Collar, Grass, and Antennas
Back Stitch- Beak and Feet
Lazy Daisy- Wings
Running Stitch- Bee's Trail
Bullion- Bee's Body (Number of wraps: 5, 9, 9, 9, 9, 9, 5)

Wednesday, September 23, 2009

Bias Bound Collar

Now that we are officially into Fall, it was time to get busy on that corduroy fabric that I purchased several weeks ago! This cute knicker is made from pattern #103 and is made from a dusty green feather wale corduroy, and a white pique' collar which is trimmed with a bias binding.

Here are the basic directions for adding a bias binding to any collar. This is the same technique that quilters use to finish their quilts.

With wrong sides together, baste the collar lining to the collar. Using the seam allowance that the pattern calls for, stitch along the outer edge of the collar. Cut along the stitching line to eliminate the seam allowance.

To make the bias strip, fold the fabric making a 45 degree angle. Press and cut along the fold line.

Fold the fabric a second time to a 45 degree angle to the width you would like the bias binding. The width of the binding should be 4 times the desired amount of binding showing on the front of your collar. My collar has a 1/2" binding showing on the front, so the bias binding strips were 2" wide.

Measure around the outer edge of the collar to find the length of the bias binding. With right sides together, pin and stitch the strips together using a 1/4" seam to make one long strip.

Press the strips open, pressing the seam to one side.

Wrong sides together, fold the bias strip in half and press.

With the right side of the collar and the binding together, open the bias binding out and matching raw edges, pin and stitch the bias binding to the outer edge of the collar. The seam allowance will be the depth of the binding that will show on the front of the collar. For this collar a 1/2" seam was used. When stitching around a curve, ease the binding around the curve and pin and stitch in place. To turn a corner, stop stitching and back stitch the depth of the seam allowance from the edge of the collar.

Raise the presser foot of the machine and turn the collar. Fold the fabric back at a 45 degree angle to the back stitching.

Extend the fold of the binding all of the way back to the raw edge. Place a pin where the two seam allowances intersect.

Begin stitching where the pin was placed.

There will be a loose fold at the corner. Press the fold to one side.

Press the binding to the wrong side of the collar. Turn under the raw edge to the stitching line. Pin in place and slip stitch by hand.

After the slip stitching is done, you collar is completed!

Thursday, September 17, 2009

Satin Stitched Pumpkin

The Satin Stitch is one of the more difficult stitches to master, but with a few tips, you will be ready to give it a try! Because of the weight of the fabric and the prominent grain, I like to use pique fabric when teaching this stitch. The pumpkin is divided into small manageable segments which makes it a good design choice for the beginner. Hoop the fabric, and using one strand of embroidery floss, knot one end of the floss and come up in the middle of one of the pumpkin segments. Go back down through the fabric directly across from where the first stitch came up.
Continue stitching up the pumpkin segment, keeping the stitches one needle width apart, and making sure that the stitches lie flat and smooth on the fabric.

When you reach the top of the segment where the pumpkin leaf intersects, stitch one side of the segment then cross over on the back of the fabric and complete the other side.

After the top of the segment is competed, bring the needle and thread up one needles width below the first stitch and complete the segment stitching down to the bottom of the pumpkin. Stitch the second segment and continue until the pumpkin is completed.

Using two strands of embroidery floss. Knot one end of the thread and stitch between the pumpkin segments and the outer edge of the pumpkin with a Back Stitch. This a great way for the beginner to hide any irregular stitches!

Satin stitch the pumpkin stem and leaves. Stitch the vines using a Stem or Outline Stitch using one strand of floss.
More detailed instructions for all of the stitches mentioned, along with a pumpkin embroidery design can be found in the Heirloom Embroidery Book.

Wednesday, September 16, 2009

Tailored Christening Gown

I wanted to share pictures of the Christening Gown that I will be teaching at Martha Pullen's School of Art and Fashion in Feb. 2010. The Christening Gown will be offered as two pre-day classes. The gown is made from a luxurious handkerchief linen and trimmed with ecru lace. Hand embroidery on the collar adds elegance, while the pleats down the front give the gown a more tailored look that makes it suitable for a baby boy or girl. The gown is very easy to make and is a great beginner project for those who may be new to heirloom laces and fabrics.

Friday, September 11, 2009

Smocking and Construction School


I have been sewing like crazy getting the garments ready for Martha Pullen's School of Art and Fashion Feb.2010! Since smocking is my absolute favorite, I am very excited about teaching a full 4 days of smocking construction and smocking tips. I have received several e-mails asking what the projects would be......so here they are! The first project will be your choice of #132 sunsuit or sundress. This will be completed as a ready to smock and as time allows we will begin smocking "Campbell's Bunnies" covering all of the picture smocking tips.


The next project will be the a smocked version of #122 Baby Apron. In class we will adapt the pattern for smocking while learning how to smock up to the neck edge of a garment. Choose from either the boy version with a piped collar or the girl version with a machine stitched scalloped bias binding around the collar.

Our final project will be a classic bishop style dress. We will pleat the bishop, learn how to shape and finish the neck opening and make the placket opening in back. We will also begin to smock our bishop and cover all of the smocking tips for this style dress.

I have worked hard to make sure that we cover the three main types of smocking construction in these classes so that you will have the confidence to go home and tackle all of those smocking projects you have been dreaming about! Take time to visit http://www.marthapullen.com/ for more information about these and other classes.

Monday, September 7, 2009

Ballgame Sewing


Football season has taken on a whole different meaning now that my daughter and I have discovered that we can sew together while the guys watch the game! One of her best friends had requested a diaper bag using the University of Alabama colors. She found fabrics the colors she needed, machine embroidered a letter A on the front, and stitched the elephant out to use as the pacifier pocket. For the first time ever, we can hardly wait until the next ballgame and our next sewing project!

Saturday, September 5, 2009

The End of Summer

If Labor Day weekend signals the end of summer, I want to know, where did the summer go? The entire summer seemed to just fly by, but at the same time when I look at this picture taken at the beach in June, it seems light years ago! Our summer was spent getting settled after our move in May, painting the inside of my mother's and our house, teaching at Martha Pullen School, son deploying to Iraq, and general day to day stuff. In between all of that we managed to work in bike rides, evening walks, picnic and concerts on the river. Our vacation consisted of picking up the son who was leaving for Iraq and spending 4 days at the beach with him. It sounds like a good plan until you realize that both of these guys can spend 4 days at the beach and never get in the water! They did go to a "guy" movie and deep sea fishing and seemed to have a good time. But, once again I vowed never to go to the beach with just the guys!
Although the weather is still warm and the leaves have not begun to change, we are starting to see the little changes that signal Autumn. We are starting to have cooler nights and shorter days, and of course for those who care, college football has begun. I try to take advantage of all those ball games by doing some fun sewing projects on the weekends. Tonight we have plans to go to our daughter's house for the game and while the guys watch football we are going to sew! She is needing to make a diaper bag for a friend and we decided that it would be a fun project to do together. The guys are going to be wondering why we are encouraging them to watch so many games this year...
So, let's take advantage of the time we have to sew for a new season and remember how fast the time flies by. While talking to our son in China the other night he said, "Well, I'll see you in just 12 weeks." Twelve weeks? "Yes, the first of December." Yikes!

Wednesday, September 2, 2009

Dotted Swiss Fabric


One of the best parts of designing patterns is getting to see what other people do with them! Retta, a friend of several years, called and was telling me about how she had used pattern #109 to feature the Old Fashioned Dotted Swiss fabric that she carries at her online store. I asked if she could send a picture and this is what she sent. Wow! What a beautiful outfit. I had forgotten how soft and femine dotted swiss looks. What a great outfit to bring a new baby girl home from the hospital in. You can order the fabric, lace and bonnet pattern from her website at http://www.rettacarolcreations.com/.

LinkWithin

Related Posts with Thumbnails